Breathing New Life Into a 20-Year-Old Outdoor Chair
Oct 30, 2025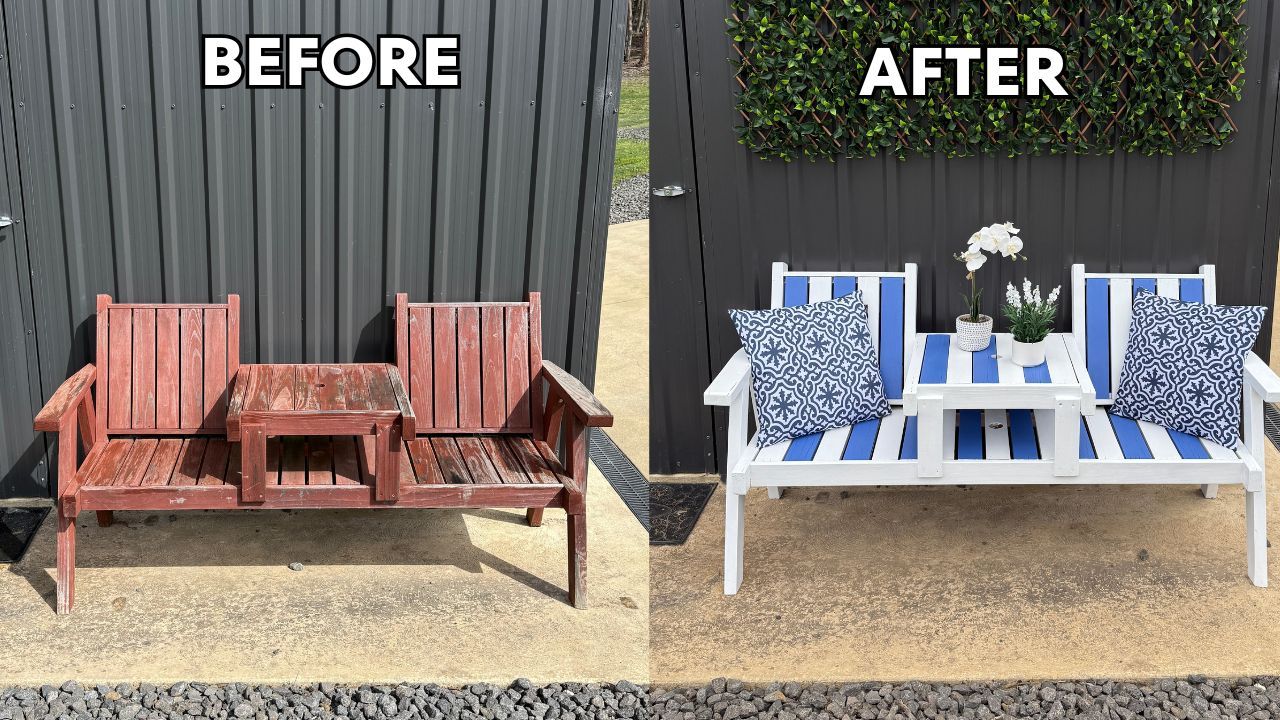
Some DIY projects are just about creating something pretty, but others hold stories that run a little deeper.
This sweet little outdoor table and chair set was made over 20 years ago by my father-in-law.
He gifted it to his parents, and when they passed away, it found its way to us.
For years, it sat beside our shed, gathering dust and cobwebs, quietly waiting for someone to bring it back to life.
Every time I walked past it, I’d think, “One day, I’ll get to that.” But like so many of our good intentions, that day just kept getting pushed back. Until now.
The Chair’s Story
It’s funny how the simplest things can become part of our routines. This chair, tucked beside the shed, became my little outdoor spot whenever the kids were riding their motorbikes in the paddock.
They’re still young enough that they need a constant eye on them, so I often find myself sitting there, cup of tea in hand, watching them do laps and listening to the hum of those little engines.
So when I decided to finally give it a makeover, I knew I didn’t want to replace it with something new. I wanted to honour the story behind it while giving it a fresh, fun twist that felt like us and putting it back where it currently is to enjoy my kids outside in the fresh air.
Step 1: Cleaning and Prepping
Before I could dive into the fun part (painting), I had to face the not-so-fun part, cleaning. This chair had years of dirt, dust, and spiderwebs built up, so I gave it a thorough clean down.
Once everything was dry, I pulled out my Orbital Sander and a 120 grit sandpaper to give the entire surface a good scuff. I didn’t need to take it back to raw timber since I planned to paint it fully, but sanding was essential to smooth any rough spots, remove old flaking varnish, and help the primer stick properly.
If you’re new to upcycling, here’s a tip: you don’t always need to sand back to bare wood. A light sand to remove the sheen and create grip for the primer is usually enough.
Step 2: Priming for a Smooth Finish
Once the sanding was done, I gave the whole chair a good wipe-down to remove any dust before moving on to the primer. For this project, I used Zinsser Bin 1,2,3, one of my go-to adhesion primers.
This particular primer has excellent stain-blocking properties, which was important because the chair had an old reddish varnish.
Without a stain blocker, those red tones can bleed through light paint colours, leaving you with a pinkish tint that ruins your finish.
I applied an even coat of primer using a good-quality brush and roller, making sure to cover all sides and edges. Because the weather wasn’t great (spring can be unpredictable), I moved the chair inside to dry completely before moving on to the next step.

Step 3: Adding the Base Coat
Now for the fun part, colour! I decided to paint the chair in blue and white stripes to give it a fresh vibe that still felt playful and unique.
I started with Vivid White Dulux Paint, applying it to the entire chair as my base colour.
Once that dried, I painted the alternating sections with Dulux Bio Blue Colour Exterior Paint.
After the first coat, I could already see the transformation starting. The contrast of crisp white and bold blue made such a statement. But painting white is rarely a one-and-done process. After two coats, the blue looked perfect, but the white still needed more coverage.
So I went in for a third coat to get that clean, opaque finish. Patience is key here, especially with lighter colours.

Step 4: Styling the Space
Once the paint was completely dry, I realised I didn’t want to stop there. This chair had turned out so cute that it deserved an equally beautiful spot to live in.
So I picked up a large artificial hedge panel from Bunnings to mount on the shed wall behind it.
This instantly created a lush, green backdrop that made the area feel more inviting. It also added a touch of texture and colour that complemented the stripes perfectly.
To make the space extra cozy, I added some cushions in complementary colours.
Then I styled the area with a couple of artificial plants in pots to finish the look. The end result was an outdoor nook that feels both relaxing and full of character, the perfect little retreat for keeping an eye on the kids while enjoying some fresh air.

The Final Reveal
The transformation was even better than I imagined. The bold stripes gave this sentimental piece a new personality, and it now stands out like a cheerful statement in our yard.
Every time I sit there watching my kids race around, I feel a little wave of gratitude. What was once an old, weathered chair is now a beautiful blend of memory and creativity, a symbol of family, history, and a touch of modern fun.
Why Upcycling Matters
Upcycling is one of my favourite things to do because it’s about so much more than saving money (though let’s be real, I definitely saved hundreds by not buying new outdoor furniture).
It’s about honouring what already exists and reimagining it into something beautiful again.
This chair had already lived one life. It was built by hand, loved by family, and left to rest.
Now it’s been given a second chance and in the process, it’s added something really special to our home.
So if you’ve got an old piece of furniture sitting around collecting dust, maybe it’s time to see what it could become. Head into Bunnings as get some supplies and get started!
✨ So….. what’s your next upcycling project going to be? ✨
